<?xml version="1.0" encoding="utf-8"?><feed xmlns="http://www.w3.org/2005/Atom" ><generator uri="https://jekyllrb.com/" version="3.9.5">Jekyll</generator><link href="http://rodrigo-silveira.com/feed.xml" rel="self" type="application/atom+xml" /><link href="http://rodrigo-silveira.com/" rel="alternate" type="text/html" /><updated>2024-07-04T19:07:49+00:00</updated><id>http://rodrigo-silveira.com/feed.xml</id><title type="html">portfolio</title><subtitle>Rodrigo Silveira</subtitle><author><name>Rodrigo Silveira</name></author><entry><title type="html">Hitomezashi Stitch Patterns in HTML Canvas</title><link href="http://rodrigo-silveira.com/2022/01/26/hitomezashi-demo/" rel="alternate" type="text/html" title="Hitomezashi Stitch Patterns in HTML Canvas" /><published>2022-01-26T00:00:00+00:00</published><updated>2022-01-26T00:00:00+00:00</updated><id>http://rodrigo-silveira.com/2022/01/26/hitomezashi-demo</id><content type="html" xml:base="http://rodrigo-silveira.com/2022/01/26/hitomezashi-demo/"><![CDATA[<p>The other day I came across the concept of Hitomezashi stitch patterns from a <a href="https://www.youtube.com/watch?v=JbfhzlMk2eY" target="_blank">Numberphile video</a> on the subject. Before the video was over, I realized I had to code that up and see for myself how the probability for a point starting on/off would influence the pattern.</p>

<p>The implementation below has a fixed probability of 0.5 for column starting on, and 0.75 for a row starting on.</p>

<style>
  #demoContainer canvas {
  image-rendering: pixelated;
  cursor: pointer;
  }
</style>

<div id="demoContainer" style="overflow: hidden; box-shadow: 0 0 10px #ccc; margin: 0 0 2em; height: 60vh;"></div>
<script src="/js/demo/hitomezashi.js"></script>

<h4 id="click-on-the-pattern-above---after-the-flood-fill-completes">(click on the pattern above - after the flood fill completes)</h4>

<p>Note: flood fill has been artificially slowed down for dramatic effect.</p>

<p>Seems that the more that the probability diverges from 0.5, the more individual squares emerge.</p>

<p>Next steps for things to experiment with:</p>

<ul>
  <li>✅ Add flodding and attempt to imperically convince myself that the assumption stated in the video is correct - namely, that it will always take two colors to fill the board.</li>
  <li>What are all of the individual patterns that can be made?</li>
  <li>How does symmetry about both axes influence the pattern?</li>
  <li>What patterns emerge when every point starts off, and only every <code class="language-plaintext highlighter-rouge">n</code> point starts on (for different values of <code class="language-plaintext highlighter-rouge">n</code>).</li>
  <li>Finally, for the ultimate time sink: initialize Conway’s Game of Life boards with Hitomezashi pattern.</li>
</ul>

<h2 id="flooding-algorithm">Flooding algorithm</h2>

<p>Since I have not yet done any research on efficient flooding algorithms (I’m not exaclty sure if this is the correct term), I’m posting my research here to simplify the upcoming writeup on how it works.</p>

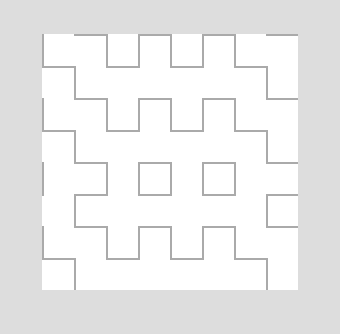
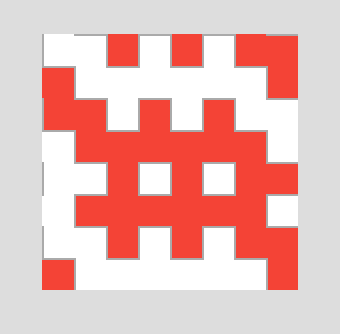
<p>The initial objective is simple: given the above grid (or a subsection of it, as shown below), color an entire white section until it hits a wall.</p>

<p><img src="/images/demo/hitomezashi-patch.png" alt="Hitomezashi patch" />
<img src="/images/demo/hitomezashi-patch-filled-once.png" alt="Hitomezashi patch partially flooded" />
<img src="/images/demo/hitomezashi-patch-filled-all.png" alt="Hitomezashi patch completely flooded" /></p>

<p>After being able to flood a single section, the goal is to fill every other section (no two adjacent section must have the same color).</p>

<p>The pixel data for the patch above can be <a href="/js/demo/hitomezashi.json">found here</a>. That file is formatted like the <a href="https://developer.mozilla.org/en-US/docs/Web/API/ImageData" target="_blank">JavaScript ImageData</a>. That is, within the payload, the attribute <code class="language-plaintext highlighter-rouge">$.data</code> represents</p>

<blockquote>
  <p>…a one-dimensional array containing the data in the RGBA order, with integer values between 0 and 255 (inclusive).</p>
</blockquote>

<h2 id="update">Update</h2>

<p>Turns out a flood fill algorithm is pretty simple. My current implementation is pretty naive: it uses a recursion (with memoization to avoid processing the same pixel multiple times). The issue is that each iteration calls up to four other recursions, so if the path to be filled is big, it’ll throw a <code class="language-plaintext highlighter-rouge">Maximum Call Stack Size Exceeded</code> exception. The way I’m getting around that for now is by using <code class="language-plaintext highlighter-rouge">setTimeout(recursion, 0)</code>. This gets me through the night, but clearly not ideal.</p>

<p>Next iteration: use the backtracking algorithm so there won’t be any recursion involved.</p>]]></content><author><name>Rodrigo Silveira</name></author><summary type="html"><![CDATA[The other day I came across the concept of Hitomezashi stitch patterns from a Numberphile video on the subject. Before the video was over, I realized I had to code that up and see for myself how the probability for a point starting on/off would influence the pattern.]]></summary></entry><entry><title type="html">Genetic Algorithm Example</title><link href="http://rodrigo-silveira.com/2020/01/03/genetic-algorithms-example/" rel="alternate" type="text/html" title="Genetic Algorithm Example" /><published>2020-01-03T00:00:00+00:00</published><updated>2020-01-03T00:00:00+00:00</updated><id>http://rodrigo-silveira.com/2020/01/03/genetic-algorithms-example</id><content type="html" xml:base="http://rodrigo-silveira.com/2020/01/03/genetic-algorithms-example/"><![CDATA[<p>In this toy demonstration of genetic algorithms, the algorithm learns some arbitrary 2D function. The “chromosome” is represented by a sequence of <code>&lt;distance, angle&gt;</code> pairs. By rendering the first point at some location, we can render the next point in the sequence by computing the <code>&lt;x, y&gt;</code> coordinates relative to that first point by using the distance and angle for the current gene.</p>

<p>My motivation for this demo was to apply what I’ve been learning about genetic algorithms (in the context of reinforcement learning and optimizing/training deep learning models), but in a slightly less contrived application as most demos I’m seeing online. Typically, folks will demonstrate how to learn a single value (such as the pixels that compose an image or a cardinal direction to navigate a maze). The following example has two variables (angle and distance) and a minor ordering dependency. That is, if the first gene is bad, the second (and all subsequent ones) will likely not perform well.</p>

<h2 id="fitness-function">Fitness Function</h2>

<p>The fitness function for the entire instance is the sum of the Euclidean distance of each corresponding point to the base function.</p>

<h2 id="how-it-works">How it works</h2>

<p>To render a 2D function in the canvas below and start the simulation, click the <em>Start</em> button below to use the default sine wave or draw a pattern using your mouse/finger/stylus directly on the canvas.</p>

<p>In the rendering below, you’ll see the base function in green, and dark red lines representing some of the instances of the population. The fainter/thicker the line, the worse is its fitness. The thinnest, darkest line represents the best instance.</p>

<div id="demoContainer"></div>
<script src="/js/demo/genetic-algorithm.js"></script>]]></content><author><name>Rodrigo Silveira</name></author><summary type="html"><![CDATA[In this toy demonstration of genetic algorithms, the algorithm learns some arbitrary 2D function. The “chromosome” is represented by a sequence of &lt;distance, angle&gt; pairs. By rendering the first point at some location, we can render the next point in the sequence by computing the &lt;x, y&gt; coordinates relative to that first point by using the distance and angle for the current gene.]]></summary></entry><entry><title type="html">R&amp;amp;D Backlog</title><link href="http://rodrigo-silveira.com/2019/12/30/backlog/" rel="alternate" type="text/html" title="R&amp;amp;D Backlog" /><published>2019-12-30T00:00:00+00:00</published><updated>2019-12-30T00:00:00+00:00</updated><id>http://rodrigo-silveira.com/2019/12/30/backlog</id><content type="html" xml:base="http://rodrigo-silveira.com/2019/12/30/backlog/"><![CDATA[<p>The purpose of my blog is to post unpolished, throwaway, R&amp;D type stuff. The more in-depth discussions will generally be posted on <a href="https://medium.com/@formigone">Medium.com</a> and the posts here will contain more interactive demos. Below is a growing list of things I’m curious to try out and research more, as well as new ideas I come across.</p>

<h2 id="to-do">To do</h2>

<ul>
  <li>Arxiv.org scraper
    <ul>
      <li>Following Jeff Dean’s advice to read lots of paper abstract, I wrote a trivial API that queries arxiv.org and returns a list of abstracts for quick scanning. Now I need to post that code.</li>
    </ul>
  </li>
  <li><a href="/2020/01/03/genetic-algorithms-example">Genetic algorithms</a> (done)
    <ul>
      <li>I’m currently mostly curious about neuroevolution in general.</li>
    </ul>
  </li>
</ul>]]></content><author><name>Rodrigo Silveira</name></author><summary type="html"><![CDATA[The purpose of my blog is to post unpolished, throwaway, R&amp;D type stuff. The more in-depth discussions will generally be posted on Medium.com and the posts here will contain more interactive demos. Below is a growing list of things I’m curious to try out and research more, as well as new ideas I come across.]]></summary></entry><entry><title type="html">Machine Learning - Linear Classifier</title><link href="http://rodrigo-silveira.com/2017/07/18/machine-learning-demo-linear-classifier/" rel="alternate" type="text/html" title="Machine Learning - Linear Classifier" /><published>2017-07-18T00:00:00+00:00</published><updated>2017-07-18T00:00:00+00:00</updated><id>http://rodrigo-silveira.com/2017/07/18/machine-learning-demo-linear-classifier</id><content type="html" xml:base="http://rodrigo-silveira.com/2017/07/18/machine-learning-demo-linear-classifier/"><![CDATA[<p>An interactive demo showing linear regression fitting a very separable dataset. This work was very early practice as I was learning the foundations of supervised learning.</p>

<h1 id="about-this-post">About this post</h1>

<p>As mentioned in other posts… last night (November 4, 2020) I was showing my 7 year old daughter what Twitter is. I decided to show her some of the weird stuff I’d posted over the years. One of the posts was a link to an old demo I had posted on an old version of this blog. I clicked on the link, only to realize I’d removed all my old blog posts not related to my current pursuit of AI and Machine Learning. My daughter told me that I “should never delete stuff, because then people would never know what I had to say or show them.”</p>

<p>That 7 year old wisdom was enough motivation for me to dig through my Github account and find the code for that and other demos, which is what you’ll find below.</p>

<h1 id="the-original-content">The original content</h1>

<p>After building a linear regression model/trainer, the next natural step was to extend the JavaScript library to perform linear classification. Although making the library perform multi-class classification, this particular implementation only classifies between two classes.</p>

<h2 id="demo-learning-to-classify-two-classes">Demo: Learning to classify two classes</h2>
<hr />

<p>This toy application is given random points throughout a two dimensional grid. A random line is selected to separate the points. Any points above the line are assigned a color, and points below the line are assigned a different color. The purpose of the algorithm is to learn which points belong to each class. After each learning iteration, the app classifies every point in the grid. The background color is pointed based on the class the algorithm classifies.</p>

<div id="linear-classifier-container"></div>
<style>
    .lin-reg-canvas {
        background: #fff;
        width: 50%;
        image-rendering: pixelated;
    }
    #painting-container p { font-family: monospace; }
    #painting-container button { margin: 10px auto; }
    @media only screen and (max-width: 600px) {
        .lin-reg-canvas {
            width: 100%;
        }
    }
</style>

<script src="/js/MathJax.js"></script>

<script src="/js/demo/logistic_regression_plot.bundle.js"></script>

<script>formigone.logistic_regression_plot.default(document.getElementById('linear-classifier-container'));</script>

<hr />

<h2 id="implementation-details">Implementation details</h2>

<p>With this being my first attempt to implement a logistic regression model in JavaScript, I was surprised at how simple it really was to do. The training code consists of a few lines of code:</p>

<div class="language-plaintext highlighter-rouge"><div class="highlight"><pre class="highlight"><code>SigmoidClassifier.prototype.train = function (samples, labels, config = { learningRate: 0.05, epochs: 10 }) {
  const learningRate = config.learningRate;
  const maxEpochs = config.epochs;
  const M = samples.length;
  let epoch = 0;

  const lr = learningRate / M;
  const costFrac = -1 / M;

  while (epoch++ &lt; maxEpochs) {
    const scores = samples.map(sample =&gt; this.score(sample));
    const errors = scores.map((score, i) =&gt; score - labels[i][0]);
    this.params = this.params.map((param, col) =&gt; {
      return param - lr * errors.reduce((acc, error, row) =&gt; (acc + error * samples[row][col]), 0);
    });
  }
};
</code></pre></div></div>

<p>In summary, the update for each weight is performed by simultaneously updating all weights as follows:</p>

\[\theta_{j} := \theta_{j} - \alpha \sum^m_{i=1}(h_\theta(x^{(i)}) - y^{(i)})x^{(i)}_j\]

<p>That is:</p>
<ul>
  <li>\(\alpha\) is the learning rate</li>
  <li>\(h_\theta(x^{(i)})\) is the prediction for the ith sample</li>
  <li>\(y^{(i)}\) is the actual label for the ith sample</li>
  <li>\(\theta_{j}\) is the jth weight in the model</li>
</ul>

<p>For completion, the score function is a simple sigmoid activator implemented as</p>

<div class="language-plaintext highlighter-rouge"><div class="highlight"><pre class="highlight"><code>SigmoidClassifier.prototype.score = function (inputs) {
  const sum = inputs.reduce((acc, input, i) =&gt; {
    return acc + input * this.params[i];
  }, 0);

  return 1 / (1 + Math.exp(-sum));
};
</code></pre></div></div>

<p>My next goal is now to write a simple neural network so I can perform the same classification concept, but with a non-linear data set.</p>

<h2 id="lessons-learned">Lessons learned</h2>

<p>The main takeaway I got from this exercise was that the size of the input data is key. Concretely, I had features that ranged between 0-600 (the width in pixels of my grid). The problem this caused is that I’d get <code class="language-plaintext highlighter-rouge">Infinity</code> when computing the score of a few points at the upper end of that range. A simple solution is to simply scale those values down with something as simple as</p>

\[x = x / M\]

<p>Where \(M\) is the highest (max) value of a given feature across the training set.</p>]]></content><author><name>Rodrigo Silveira</name></author><summary type="html"><![CDATA[An interactive demo showing linear regression fitting a very separable dataset. This work was very early practice as I was learning the foundations of supervised learning.]]></summary></entry><entry><title type="html">Machine Learning Painting with Linear Regression</title><link href="http://rodrigo-silveira.com/2017/07/11/machine-learning-painting-with-linear-regression/" rel="alternate" type="text/html" title="Machine Learning Painting with Linear Regression" /><published>2017-07-11T00:00:00+00:00</published><updated>2017-07-11T00:00:00+00:00</updated><id>http://rodrigo-silveira.com/2017/07/11/machine-learning-painting-with-linear-regression</id><content type="html" xml:base="http://rodrigo-silveira.com/2017/07/11/machine-learning-painting-with-linear-regression/"><![CDATA[<p>An interactive demo of using linear regression to minimize a function that “learns” what the values of a matrix of pixels should be so that it forms a photograph. This work was very early practice as I was learning the foundations of supervised learning.</p>

<h1 id="about-this-post">About this post</h1>

<p>As mentioned in other posts… last night (November 4, 2020) I was showing my 7 year old daughter what Twitter is. I decided to show her some of the weird stuff I’d posted over the years. One of the posts was a link to an old demo I had posted on an old version of this blog. I clicked on the link, only to realize I’d removed all my old blog posts not related to my current pursuit of AI and Machine Learning. My daughter told me that I “should never delete stuff, because then people would never know what I had to say or show them.”</p>

<p>That 7 year old wisdom was enough motivation for me to dig through my Github account and find the code for that and other demos, which is what you’ll find below.</p>

<h1 id="the-original-content">The original content</h1>

<p>This is my first implementation of a machine learning algorithm in JavaScript. I think linear regression is an appropriate place to start, as the only thing required to get something going is to implement gradient descent. Although the code is not optimized for performance, it demonstrates the underlying concepts of minimizing a cost function in order to learn the parameters that best fit the training data.</p>

<h2 id="demo-learning-an-input-image">Demo: Learning an input image</h2>
<hr />

<p>This toy application feeds the pixel data for some input image to a linear regression model, which eventually learns what RGB value corresponds with each pixel coordinate. A more technical explanation follows.</p>

<div id="painting-container"></div>
<style>
    .lin-reg-canvas { background: #fff; width: 50%; image-rendering: pixelated; }
    #painting-container p { font-family: monospace; }
    #painting-container button { margin: 10px auto; }
    @media only screen and (max-width: 600px) {
        .lin-reg-canvas {
            width: 100%;
        }
    }
</style>

<script src="/js/gstatic-charts-loader.js"></script>

<script src="/js/demo/linear_regression_painting.bundle.js"></script>

<script>formigone.linear_regression_painting.default('/images/samira-28x28.jpg', document.getElementById('painting-container'));</script>

<hr />

<h2 id="how-linear-regression-learns">How linear regression “learns”</h2>

<p>The first image in the demo above is used as the target that the algorithm is to learn. Since the goal is for the algorithm to learn every pixel in the image, I create a model with <code class="language-plaintext highlighter-rouge">n + 1</code> weights, where <code class="language-plaintext highlighter-rouge">n = width * height</code> pixels in the input image, and the additional value acts as a bias value.</p>

<p>The training data consists the coordinate of each pixel, with the expected output as the hex value of the corresponding pixel. Since this is a linear model (as opposed to a neural network), I’m not sure how I can use two features (such as [x, y] values) and affect as many weights as I’d like. Thus, each training sample is a vector of length <code class="language-plaintext highlighter-rouge">n</code> with all zeros, and a one representing the pixel location in question.</p>

<div class="language-plaintext highlighter-rouge"><div class="highlight"><pre class="highlight"><code>// Suppose the target image is a 2x2 image
const trainingX = [
   [1, 0, 0, 0],
   [0, 1, 0, 0],
   [0, 0, 1, 0],
   [0, 0, 0, 1],
];

const trainingY = [
   [0xfff],
   [0xf00],
   [0x0f0],
   [0x00f],
];
</code></pre></div></div>

<p>In the example above, <code class="language-plaintext highlighter-rouge">trainingX[0]</code> refers to pixel [0, 0], which maps to the expected value <code class="language-plaintext highlighter-rouge">trainingY[0]</code>, which happens to be a white color.</p>

<p>To keep things simple, I run <a href="https://en.wikipedia.org/wiki/Gradient_descent">gradient descent</a> for a small amount of epochs, then use the model to redraw the image pixel by pixel. The process repeats until the cost function returns below some arbitrary threshold.</p>

<p><img src="/images/samira-400.jpg" alt="Using linear regression to learn images" style="width: 100%" /></p>

<h2 id="javascript-implementation-of-linear-regression">JavaScript implementation of linear regression</h2>

<p>Checkout the entire source for this at <a href="GitHub">https://github.com/formigone/machine-learning/blob/master/lin-reg/LinearRegressionModel.js</a>. My purpose with that repository is to learn and experiment, and not to produce a high performance machine learning library.</p>

<p>The main class is <code class="language-plaintext highlighter-rouge">LinearRegressionModel</code>, which has a simple interface:</p>

<div class="language-plaintext highlighter-rouge"><div class="highlight"><pre class="highlight"><code>/**
 *
 * @param {Array&lt;Array&lt;number&gt;&gt;} samples List of samples
 * @param {Array&lt;Array&lt;number&gt;&gt;} labels List of vectors
 */
 LinearRegressionModel.prototype.train = function(samples, labels){};
 
 /**
  *
  * @param {Array&lt;number&gt;} inputs
  */
 LinearRegressionModel.prototype.score = function(inputs){};

/**
 *
 * @returm {Array&lt;number&gt;}
 */
LinearRegressionModel.prototype.getParams = function(){};

/**
 *
 * @param {Array&lt;number&gt;} params
 */
LinearRegressionModel.prototype.setParams = function(params){};
</code></pre></div></div>

<p>To me the most exciting part about it is the implementation of the training algorithm, which I was pleasantly surprised with how simple it was to get right within 15 minutes. Ignoring some of the logging stuff in that method, the steps are:</p>

<ul>
  <li>Add a constant input value of 1 to each sample (to reconcile the bias weight).</li>
  <li>Score each sample using the current weights in the model.</li>
  <li>Calculate the error for each sample (<code class="language-plaintext highlighter-rouge">score - expected</code>).</li>
  <li>Create a new weights vector by updating each weight with <code class="language-plaintext highlighter-rouge">weight[y] - learningRate * sum(errors[i], samples[i])</code></li>
</ul>

<hr />

<div class="language-plaintext highlighter-rouge"><div class="highlight"><pre class="highlight"><code>/**
 *
 * @param {Array&lt;Array&lt;number&gt;&gt;} samples List of samples
 * @param {Array&lt;Array&lt;number&gt;&gt;} labels List of vectors
 * @param {Object=} config - { learningRate, maxCost, epochs, logCost, logCallback }
 */
LinearRegressionModel.prototype.train = function (samples, labels, config) {
  var maxEpochs = config.epochs || 10;
  var epoch = 0;
  var maxCost = config.maxCost || 0.05;
  var learningRate = config.learningRate || 0.05;
  var logCost = config.logCost || 100;
  var logCallback = config.logCallback || function () {};
  var M = samples.length;

  var lr = learningRate / M;
  var costFrac = 1 / (2 * M);

  // Add zeroth bias input
  samples = samples.map(sample =&gt; [1].concat(sample));

  while (epoch++ &lt; maxEpochs) {
    var scores = samples.map(sample =&gt; this.score(sample, true));

    if (logCost &gt; 0 &amp;&amp; epoch % logCost === 1) {
      var errorSquared = scores.reduce(function (acc, score, i) {
        var diff = score - labels[i][0];
        return acc + diff * diff;
      }, 0);
      var cost = costFrac * errorSquared;
      if (Number.isNaN(cost)) {
        throw new Error('Cost exploded');
      }

      if (cost &lt; maxCost) {
        break;
      }

      logCallback({ model: this, cost, epoch });
    }

    var errors = scores.map((score, i) =&gt; score - labels[i][0]);
    this.params = this.params.map(function (param, col) {
      return param - lr * errors.reduce((acc, error, row) =&gt; {
          return acc + error * samples[row][col];
        }, 0);
    });
  }
};
</code></pre></div></div>

<p>My next goal is to implement stochastic gradient descent and see for myself what the trade-offs are. Next I plan on writing a simple neural network and try the same exercise. Finally, I will implement the same concept using TensorFlow and get more involved with it.</p>

<p>One question I’m trying to find a definitive answer to is: using linear regression, is it possible to input only two values (namely, [x, y]) and train the model to correctly output the value for all pixels colors of the image represented by the training data?</p>]]></content><author><name>Rodrigo Silveira</name></author><summary type="html"><![CDATA[An interactive demo of using linear regression to minimize a function that “learns” what the values of a matrix of pixels should be so that it forms a photograph. This work was very early practice as I was learning the foundations of supervised learning.]]></summary></entry><entry><title type="html">Maze Traversal with Breadth-first Search &amp;amp; Depth-first Search - Old Demo</title><link href="http://rodrigo-silveira.com/2015/11/06/old-demo-bfs-dfs-maze-traversal/" rel="alternate" type="text/html" title="Maze Traversal with Breadth-first Search &amp;amp; Depth-first Search - Old Demo" /><published>2015-11-06T00:00:00+00:00</published><updated>2015-11-06T00:00:00+00:00</updated><id>http://rodrigo-silveira.com/2015/11/06/old-demo-bfs-dfs-maze-traversal</id><content type="html" xml:base="http://rodrigo-silveira.com/2015/11/06/old-demo-bfs-dfs-maze-traversal/"><![CDATA[<p>An interactive demo of using BFS and DFS to traverse a maze.</p>

<h1 id="about-this-post">About this post</h1>

<p>As mentioned in other posts… last night (November 4, 2020) I was showing my 7 year old daughter what Twitter is. I decided to show her some of the weird stuff I’d posted over the years. One of the posts was a link to an old demo I had posted on an old version of this blog. I clicked on the link, only to realize I’d removed all my old blog posts not related to my current pursuit of AI and Machine Learning. My daughter told me that I “should never delete stuff, because then people would never know what I had to say or show them.”</p>

<p>That 7 year old wisdom was enough motivation for me to dig through my Github account and find the code for that and other demos, which is what you’ll find below.</p>

<h2 id="the-demo">The Demo</h2>

<p>If I remember correctly, this demo came about during my YouTube tutorial making days. Something made me want to make a video tutorial explaining ways to traverse a map, so I wrote this demo as an illustration. I’ll forego the explanation of breadth-first search and depth-first search in this post. I will also not take the time to explain my code.</p>

<style>
#demo {
    width: 100%;
    padding-top: 75%;
    position: relative;
}

#demo canvas {
    display: block;
    top: 0;
    left: 0;
    position: absolute;
    width: 100%;
    height: 100%;
    image-rendering: -moz-crisp-edges;
    image-rendering: -webkit-crisp-edges;
    image-rendering: pixelated;
    image-rendering: crisp-edges;
}

#ctrls {
    margin: 20px 0;
    width: 100%;
}

#ctrls button {
    margin: 0 20px 0 0;
    padding: 20px;
}
</style>

<div id="demo"></div>
<div id="ctrls"></div>
<script src="/js/demo/maze.js"></script>

<p>Copyright &copy; 2015 <a href="http://www.rodrigo-silveira.com" itemprop="url">
    <span itemprop="name">Rodrigo Silveira</span></a>. All rights reserved.</p>]]></content><author><name>Rodrigo Silveira</name></author><summary type="html"><![CDATA[An interactive demo of using BFS and DFS to traverse a maze.]]></summary></entry><entry><title type="html">Code Formatter &amp;amp; Syntax Highlighter jQuery Plugin</title><link href="http://rodrigo-silveira.com/2014/02/03/code-formatter-syntax-highlighter-jquery-plugin/" rel="alternate" type="text/html" title="Code Formatter &amp;amp; Syntax Highlighter jQuery Plugin" /><published>2014-02-03T00:00:00+00:00</published><updated>2014-02-03T00:00:00+00:00</updated><id>http://rodrigo-silveira.com/2014/02/03/code-formatter-syntax-highlighter-jquery-plugin</id><content type="html" xml:base="http://rodrigo-silveira.com/2014/02/03/code-formatter-syntax-highlighter-jquery-plugin/"><![CDATA[<p>This is proof that I was one of the cool developers who not only used jQuery, but I was [on my way to becoming] a jQuery master.</p>

<h1 id="about-this-post">About this post</h1>

<p>As mentioned in other posts… last night (November 4, 2020) I was showing my 7 year old daughter what Twitter is. I decided to show her some of the weird stuff I’d posted over the years. One of the posts was a link to an old demo I had posted on an old version of this blog. I clicked on the link, only to realize I’d removed all my old blog posts not related to my current pursuit of AI and Machine Learning. My daughter told me that I “should never delete stuff, because then people would never know what I had to say or show them.”</p>

<p>That 7 year old wisdom was enough motivation for me to dig through my Github account and find the code for that and other demos, which is what you’ll find below.</p>

<h1 id="the-original-content">The original content</h1>

<p>Today I decided to write a simple plugin to extend the functionality of everybody’s favorite Javascript library: jQuery. The entire process only took around 20 minutes, so I won’t be surprised if to find major bugs in it in the next few days. I did test the plug in a little bit, but I can’t promise buglessness in this version.</p>

<h2 id="code-formatter--syntax-highlighter-jquery-plugin">Code Formatter &amp; Syntax Highlighter jQuery Plugin</h2>
<hr />

<p><img width="100%" src="/images/source-code-syntax-highlighter-172x116.jpg" alt="Syntax Highlighting for source code in webpages" /></p>

<p>All the plugin does is take source code that you write inside your HTML file, and format it with line numbers, and syntax highlighting. The highlighting part is styled through an external CSS file, which you can theme to your liking. Since I’m writing this in mid-December, I decided to style to resemble the Christmas season.</p>

<h2 id="how-it-works">How it works</h2>

<p>Using the plugin is pretty simple: Import jQuery, my plugin (which I decided to call Rokko Code, after the great Brazilian coder), and the accompanying style sheet (or a custom style sheet if you prefer).</p>

<div class="language-plaintext highlighter-rouge"><div class="highlight"><pre class="highlight"><code>&lt;script type="text/javascript" src=" jquery.js"&gt;&lt;/script&gt;
&lt;script type="text/javascript" src=" rokkocode.js"&gt;&lt;/script&gt;
&lt;link ref="stylesheet" href="rokkocode.css"/&gt;
</code></pre></div></div>

<p>The next step is to identify where in your HTML you want the plugin to be applied. In this example, I’ll write all my code inside a DIV tag with a class of “src_code”.</p>

<div class="language-plaintext highlighter-rouge"><div class="highlight"><pre class="highlight"><code>&lt;div class="src_code"&gt;
function Person(pName)
{
     this.name = pName;
     this.greet = function()
     {
          return 'Hello. My name is ' + this.name + '.';
     };
}
&lt;/div&gt;
</code></pre></div></div>

<p>Right now, if you look at your file, you should see something like this:</p>

<div class="language-plaintext highlighter-rouge"><div class="highlight"><pre class="highlight"><code>function Person(pName){
    this.name = pName;
    this.greet = function(){
        return 'Hello. My name is ' + this.name + '.'
    ;}
;}
</code></pre></div></div>

<p>Pretty boring, since you haven’t called upon RokkoCode. So now the next step is to call the Rokko Code plugin on that DIV. If you have multiple elements that are matched in the jQuery expression, they will all be formatted.</p>

<div class="language-plaintext highlighter-rouge"><div class="highlight"><pre class="highlight"><code>&lt;script&gt;$('src_code').rokkoCode();&lt;/script&gt;
</code></pre></div></div>

<p>And the final result after the call to $().rokkoCode() is this:</p>

<div class="language-plaintext highlighter-rouge"><div class="highlight"><pre class="highlight"><code>function Person(pName)
{
     this.name = pName;
     this.greet = function()
     {
          return 'Hello. My name is ' + this.name + '.';
     };
}

var me = new Person('Rodrigo');
alert( me.greet() );
</code></pre></div></div>

<h2 id="live-demo">Live Demo</h2>

<strike>View a demo of my <a href="#">RokkoCode jQuery Plugin</a>.</strike>
<p>Sadly, I was not able to find the HTML file I had with that plugin in action. Since the code for the plugin is still in my GitHub account, I will one day take the time to make an interactive demo page for it.</p>

<h2 id="source-code">Source Code</h2>

<p>Checkout my RokkoCode plugin and start formatting and highlighting any C, C++, C#, Java, Javascript, and PHP code in your HTML files today.</p>

<ul>
  <li><a href="https://github.com/formigone/rokkocode">RokkoCode jQuery Plugin</a></li>
</ul>]]></content><author><name>Rodrigo Silveira</name></author><summary type="html"><![CDATA[This is proof that I was one of the cool developers who not only used jQuery, but I was [on my way to becoming] a jQuery master.]]></summary></entry><entry><title type="html">Composite Design Pattern in PHP</title><link href="http://rodrigo-silveira.com/2014/02/03/composite-design-pattern-in-php/" rel="alternate" type="text/html" title="Composite Design Pattern in PHP" /><published>2014-02-03T00:00:00+00:00</published><updated>2014-02-03T00:00:00+00:00</updated><id>http://rodrigo-silveira.com/2014/02/03/composite-design-pattern-in-php</id><content type="html" xml:base="http://rodrigo-silveira.com/2014/02/03/composite-design-pattern-in-php/"><![CDATA[<p>Yet another explanation of some design pattern. I’m posting this almost 7 years after I first wrote this. Hopefully it helps you on your homework or on that job interview you’re preparing for :)</p>

<h1 id="about-this-post">About this post</h1>

<p>As mentioned in other posts… last night (November 4, 2020) I was showing my 7 year old daughter what Twitter is. I decided to show her some of the weird stuff I’d posted over the years. One of the posts was a link to an old demo I had posted on an old version of this blog. I clicked on the link, only to realize I’d removed all my old blog posts not related to my current pursuit of AI and Machine Learning. My daughter told me that I “should never delete stuff, because then people would never know what I had to say or show them.”</p>

<p>That 7 year old wisdom was enough motivation for me to dig through my Github account and find the code for that and other demos, which is what you’ll find below.</p>

<h1 id="the-original-content">The original content</h1>

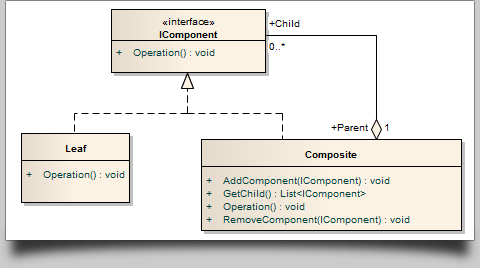
<p>I just wanted to post a quick example of the composite design pattern, implemented in PHP. I don’t want to go into great depth about how the pattern works. In short, this pattern allows you to have a tree structure where each node can be either a leaf or a composite. A composite can itself have children, which can obviously only be either a leaf or other composites. When working with this tree, the client simply calls the operation on the tree, and the tree recursively calls the operation on each node. Here’s an illustration taken from <a href="http://www.codeproject.com/Articles/10845/Composite-Design-Pattern-an-Example">The Code Project</a> of how this pattern is set up:</p>

<h2 id="composite-design-pattern-in-php">Composite Design Pattern in PHP</h2>
<hr />

<p><img title="composite-pattern-uml" src="/images/posts/composite-pattern-uml.png" alt="" width="100%" /></p>

<h2 id="example-in-php">Example in PHP</h2>
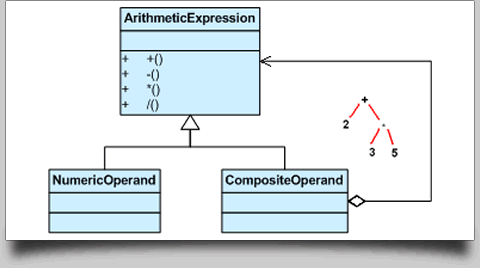
<p>In this example, I’ll be implementing a simple command line application that takes an arbitrary number of arguments, all of which should be numbers. Then the application uses a composite to add up all the numbers together. Then, to spice things up, I set up a second composite that subtracts the same numbers. Finally, we add the composites together, and negate both operations. The important part being the fact that the client only deals with two structures, which, although they are both complex, they end up being treated as simple structures (numbers). Here is a UML that resembles my implementation, taken from <a href="http://sourcemaking.com/design_patterns/composite">SourceMaking</a></p>

<p><img title="composite-pattern-example" src="/images/posts/composite-pattern-example.png" alt="" width="100%" /></p>

<h2 id="the-source-code">The Source Code</h2>
<p>To run this code, invoke the script from the command line, and pass a few numbers as arguments. If you want to run this test on a browser, you’ll have to tweak the code a bit to grab the parameters from a different source other than from $argv.</p>

<div class="language-plaintext highlighter-rouge"><div class="highlight"><pre class="highlight"><code>&lt;?php

//
// A simple implementation of the composite pattern to apply learning
// and increase understanding
//


/*************************************
* The abstract class that our composites
* will implement. The DOIT operation
* could represent any arithmetic operation
*************************************/
abstract class AritheticComposite {
  public abstract function doit();
}


/*************************************
* A simple implementation of a composite
* that adds two or composites together
*************************************/
class PlusOperator extends AritheticComposite {
  private $composites;

  public function __construct() {
    $this-&gt;composites = array();
  }

  public function add(AritheticComposite $composite) {
    array_push($this-&gt;composites, $composite);
  }

  public function doit() {
    $sum = 0;

    foreach ($this-&gt;composites as $num)
      $sum += $num-&gt;doit();

    return $sum;
  }
}


/*************************************
* What is intended to be an implementation
* of a leaf node. This will only hold a numeric
* value. Calling the DOIT operation will simply
* return the object's value.
*************************************/
class Number extends AritheticComposite {
  private $val;

  public function __construct($num) {
    $this-&gt;val = $num;
  }

  public function doit() {
    return $this-&gt;val;
  }
}


/*************************************
* Just adding order to the script
*************************************/
function main($args) {

  $plus = new PlusOperator();
  $minus = new PlusOperator();

  //
  // Add the arguments to each of the composites.
  // Since $minus represents substraction, we'll add the
  // negative of each argument to it
  foreach ($args as $key =&gt; $arg) {
    if ($key &gt; 0) {
      $plus-&gt;add(new Number($arg));
      $minus-&gt;add(new Number(-$arg));
    }
  }

  echo "Sum      = ", $plus-&gt;doit();
  echo "\n";
  echo "Diff     = ", $minus-&gt;doit();
  echo "\n";


  //
  // Now the cool part: add a composite to another one.
  // If this works, the results should be zero.
  //
  $plus-&gt;add($minus);
  echo "Negation = ", $plus-&gt;doit();
}


//
// Make it so
//
main($argv);
</code></pre></div></div>

<p>A few sample executions of the above script are represented below:</p>

<div class="language-plaintext highlighter-rouge"><div class="highlight"><pre class="highlight"><code>&gt; php composite_pattern.php 1 2 3 4 5
Sum      = 15
Diff     = -15
Negation = 0

&gt; php composite_pattern.php 1 -1 2 -2 3
Sum      = 3
Diff     = -3
Negation = 0

&gt; php composite_pattern.php 4 8 15 16 23 42
Sum      = 108
Diff     = -108
Negation = 0
</code></pre></div></div>]]></content><author><name>Rodrigo Silveira</name></author><summary type="html"><![CDATA[Yet another explanation of some design pattern. I’m posting this almost 7 years after I first wrote this. Hopefully it helps you on your homework or on that job interview you’re preparing for :)]]></summary></entry><entry><title type="html">HTML5 2D Game Programming Tutorial with GWT</title><link href="http://rodrigo-silveira.com/2014/02/03/html5-2d-game-programming-tutorial-with-gwt/" rel="alternate" type="text/html" title="HTML5 2D Game Programming Tutorial with GWT" /><published>2014-02-03T00:00:00+00:00</published><updated>2014-02-03T00:00:00+00:00</updated><id>http://rodrigo-silveira.com/2014/02/03/html5-2d-game-programming-tutorial-with-gwt</id><content type="html" xml:base="http://rodrigo-silveira.com/2014/02/03/html5-2d-game-programming-tutorial-with-gwt/"><![CDATA[<p>This is proof that I was one of the cool developers who grew up, graduated from jQuery, and stepped up their game using Google Web Toolkit (back when it was a Google project and the world was still purple and gray).</p>

<h1 id="about-this-post">About this post</h1>

<p>As mentioned in other posts… last night (November 4, 2020) I was showing my 7 year old daughter what Twitter is. I decided to show her some of the weird stuff I’d posted over the years. One of the posts was a link to an old demo I had posted on an old version of this blog. I clicked on the link, only to realize I’d removed all my old blog posts not related to my current pursuit of AI and Machine Learning. My daughter told me that I “should never delete stuff, because then people would never know what I had to say or show them.”</p>

<p>That 7 year old wisdom was enough motivation for me to dig through my Github account and find the code for that and other demos, which is what you’ll find below.</p>

<h1 id="the-original-content">The original content</h1>

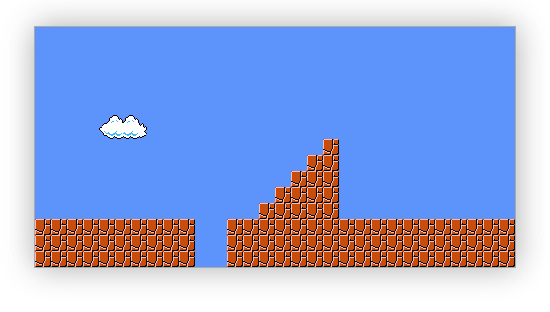
<p>Lately I’ve been playing around with GWT (<a href="https://developers.google.com/web-toolkit/">Google Web Toolkit</a>) and HTML5 game development. My first goal at this point is to get a 2D tile-based game working, and my first sub-goal for that is to be able to load a map on a 2D canvas context. So far, this is what I have:</p>

<h2 id="html5-2d-game-programming-tutorial-with-gwt">HTML5 2D Game Programming Tutorial with GWT</h2>
<hr />

<p><img title="html5-super-mario-brother-map" src="/images/html5-super-mario-brother-map.png" alt="" width="100%" /></p>

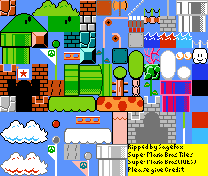
<p>The setup behind this is pretty simple: I first define a Tile object that keeps track of its own with, height, as well as its x and y coordinates within the world (or within the map). Each tile also has a background image. In order to avoid having a million different images laying around, I put all of the skins to be used for each tile in a single sprite sheet.</p>

<p><img title="mario-8-bit-sprites" src="/images/mario-8-bit-sprites.png" alt="" width="100%" /></p>

<p>I found this sprite sheet by doing a Google image search for “nes super mario brothers sprite sheet”.</p>

<p>Then, once I had my Tile class set up, the next step was to make a map to represent the world. In other words, I declared an array of arrays (a 2d array), where each element in the array represents an element of the grid within which my world is displayed.</p>

<p><img title="2d-tile-based-world-grid" src="/images/2d-tile-based-world-grid.png" alt="" width="100%" /></p>

<p>Notice how the two tiles highlighted above can be described by their x and y offset from the beginning of the map, plus their width. For example, the first tile is located at position (0, 0). Suppose the tile’s width and height are 16 pixels. That means that the next tile to the right is located at (16, 0), or (x + width, y + height). By this definition, setting up a map blue print is pretty easy. For example,</p>

<div class="language-plaintext highlighter-rouge"><div class="highlight"><pre class="highlight"><code>var mapBluePrint = [
    [0, 0, 0, 0, 0, 0],
    [0, 8, 8, 8, 8, 0],
    [0, 0, 0, 0, 0, 0],
];
</code></pre></div></div>

<p>Represents a small 3x6 world. The way I’m setting up my map using the 2D array is as follows: Each row uses two elements to describe what tile they represent from the sprite sheet. For example, if I have a sprite sheet that holds 9 tiles (a 3x3 grid), and I want a particular tile (instance of Tile) to draw the 2 block across, and first block down on my sprite sheet (block at position (1, 0) within the sprite sheet), then the map will have an entry <code class="language-plaintext highlighter-rouge">[…, 1, 0, …]</code> wherever I want that block rendered.</p>

<p>Once that map is in place, transferring it over to a 2d array of Tile objects is pretty trivial. Each visit to an element in my map results in the creation of a Tile object, with the appropriate parameter passed in straight from my parsing loop and the map blue print.</p>

<p>Once that is in place, rendering the world is just a matter of visiting each Tile and drawing it to the canvas context. Below is some throw-away prototype code I wrote in vanilla Javascript just to get a taste of how to implement the ideas mentioned above. Next step is to model my tile objects with a bit more thinking, then take it over to Java and let GWT do its thing.</p>

<p>Other things I’ll need to do before my game receives the breath of life include the following:</p>

<ul>
  <li>Build a map maker utility to simplify things with creating maps</li>
  <li>Load maps from the server as needed (asynchronously)</li>
  <li>Write I/O engine (handle user input)</li>
  <li>Write a simple animation engine for character animation and scene animation</li>
  <li>Write collision detection and physics engine</li>
  <li>Add sound effects and music to the game</li>
</ul>

<h2 id="the-code">The Code</h2>

<div class="language-plaintext highlighter-rouge"><div class="highlight"><pre class="highlight"><code>&lt;style&gt;
canvas {
  width: 480px;
  height: 240px;
  border: 1px solid #aaa;
  margin: 50px auto 0;
  display: block;
  box-shadow: 0 0 50px #aaa;
}
&lt;/style&gt;
&lt;canvas width="480" height="240"&gt;

&lt;script&gt;
    /*********************
     * The tile class
     *********************/
    var Tile = function(x, y, w, h, src, uvx, uvy){
      this.w = w;
      this.h = h;
      this.x = x;
      this.y = y;
      this.src = src;
      this.uv = [uvx, uvy];
    };
    
    /*********************
     * Loop through each time and draw it
     *********************/
    function drawIt(ctx, world){
    
    for (var y = 0, lenY = world.length; y &lt; lenY; y++)
      for (var x = 0, lenX = world[0].length; x &lt; lenX; x++)
        ctx.drawImage(world[y][x].src, 
                      world[y][x].uv[0], 
                      world[y][x].uv[1], 
                      world[y][x].w, 
                      world[y][x].h,
                      world[y][x].x,
                      world[y][x].y,
                      world[y][x].w,
                      world[y][x].h);
    }
    
    /*********************
     *
     *********************/
    function main(){
    
    var canvas = document.querySelector("canvas");
    canvas.width = 480;
    canvas.height = 240;
    
    var ctx = canvas.getContext("2d");
    
    var mapBluePrint = [
        [12, 6, 12, 6, 12, 6, 12, 6, 12, 6, 12, 6, 12, 6, 12, 6, 12, 6, 12, 6, 12, 6, 12, 6, 12, 6, 12, 6, 12, 6, 12, 6, 12, 6, 12, 6, 12, 6, 12, 6, 12, 6, 12, 6, 12, 6, 12, 6, 12, 6, 12, 6, 12, 6, 12, 6, 12, 6, 12, 6],
        [12, 6, 12, 6, 12, 6, 12, 6, 12, 6, 12, 6, 12, 6, 12, 6, 12, 6, 12, 6, 12, 6, 12, 6, 12, 6, 12, 6, 12, 6, 12, 6, 12, 6, 12, 6, 12, 6, 12, 6, 12, 6, 12, 6, 12, 6, 12, 6, 12, 6, 12, 6, 12, 6, 12, 6, 12, 6, 12, 6],
        [12, 6, 12, 6, 12, 6, 12, 6, 12, 6, 12, 6, 12, 6, 12, 6, 12, 6, 12, 6, 12, 6, 12, 6, 12, 6, 12, 6, 12, 6, 12, 6, 12, 6, 12, 6, 12, 6, 12, 6, 12, 6, 12, 6, 12, 6, 12, 6, 12, 6, 12, 6, 12, 6, 12, 6, 12, 6, 12, 6],
        [12, 6, 12, 6, 12, 6, 12, 6, 12, 6, 12, 6, 12, 6, 12, 6, 12, 6, 12, 6, 12, 6, 12, 6, 12, 6, 12, 6, 12, 6, 12, 6, 12, 6, 12, 6, 12, 6, 12, 6, 12, 6, 12, 6, 12, 6, 12, 6, 12, 6, 12, 6, 12, 6, 12, 6, 12, 6, 12, 6],
        [12, 6, 12, 6, 12, 6, 12, 6, 12, 6, 12, 6, 12, 6, 12, 6, 12, 6, 12, 6, 12, 6, 12, 6, 12, 6, 12, 6, 12, 6, 12, 6, 12, 6, 12, 6, 12, 6, 12, 6, 12, 6, 12, 6, 12, 6, 12, 6, 12, 6, 12, 6, 12, 6, 12, 6, 12, 6, 12, 6],
        [12, 6, 12, 6, 12, 6, 12, 6,  0, 7,  1, 7,  2, 7, 12, 6, 12, 6, 12, 6, 12, 6, 12, 6, 12, 6, 12, 6, 12, 6, 12, 6, 12, 6, 12, 6, 12, 6, 12, 6, 12, 6, 12, 6, 12, 6, 12, 6, 12, 6, 12, 6, 12, 6, 12, 6, 12, 6, 12, 6],
        [12, 6, 12, 6, 12, 6, 12, 6,  0, 8,  1, 8,  2, 8, 12, 6, 12, 6, 12, 6, 12, 6, 12, 6, 12, 6, 12, 6, 12, 6, 12, 6, 12, 6, 12, 6, 12, 6, 12, 6, 12, 6, 12, 6, 12, 6, 12, 6, 12, 6, 12, 6, 12, 6, 12, 6, 12, 6, 12, 6],
        [12, 6, 12, 6, 12, 6, 12, 6, 12, 6, 12, 6, 12, 6, 12, 6, 12, 6, 12, 6, 12, 6, 12, 6, 12, 6, 12, 6, 12, 6, 12, 6, 12, 6, 12, 6,  0, 0, 12, 6, 12, 6, 12, 6, 12, 6, 12, 6, 12, 6, 12, 6, 12, 6, 12, 6, 12, 6, 12, 6],
        [12, 6, 12, 6, 12, 6, 12, 6, 12, 6, 12, 6, 12, 6, 12, 6, 12, 6, 12, 6, 12, 6, 12, 6, 12, 6, 12, 6, 12, 6, 12, 6, 12, 6,  0, 0,  0, 0, 12, 6, 12, 6, 12, 6, 12, 6, 12, 6, 12, 6, 12, 6, 12, 6, 12, 6, 12, 6, 12, 6],
        [12, 6, 12, 6, 12, 6, 12, 6, 12, 6, 12, 6, 12, 6, 12, 6, 12, 6, 12, 6, 12, 6, 12, 6, 12, 6, 12, 6, 12, 6, 12, 6,  0, 0,  0, 0,  0, 0, 12, 6, 12, 6, 12, 6, 12, 6, 12, 6, 12, 6, 12, 6, 12, 6, 12, 6, 12, 6, 12, 6],
        [12, 6, 12, 6, 12, 6, 12, 6, 12, 6, 12, 6, 12, 6, 12, 6, 12, 6, 12, 6, 12, 6, 12, 6, 12, 6, 12, 6, 12, 6,  0, 0,  0, 0,  0, 0,  0, 0, 12, 6, 12, 6, 12, 6, 12, 6, 12, 6, 12, 6, 12, 6, 12, 6, 12, 6, 12, 6, 12, 6],
        [12, 6, 12, 6, 12, 6, 12, 6, 12, 6, 12, 6, 12, 6, 12, 6, 12, 6, 12, 6, 12, 6, 12, 6, 12, 6, 12, 6,  0, 0,  0, 0,  0, 0,  0, 0,  0, 0, 12, 6, 12, 6, 12, 6, 12, 6, 12, 6, 12, 6, 12, 6, 12, 6, 12, 6, 12, 6, 12, 6],
        [ 0, 0,  0, 0,  0, 0,  0, 0,  0, 0,  0, 0,  0, 0,  0, 0,  0, 0,  0, 0, 12, 6, 12, 6,  0, 0,  0, 0,  0, 0,  0, 0,  0, 0,  0, 0,  0, 0,  0, 0,  0, 0,  0, 0,  0, 0,  0, 0,  0, 0,  0, 0,  0, 0,  0, 0,  0, 0,  0, 0],
        [ 0, 0,  0, 0,  0, 0,  0, 0,  0, 0,  0, 0,  0, 0,  0, 0,  0, 0,  0, 0, 12, 6, 12, 6,  0, 0,  0, 0,  0, 0,  0, 0,  0, 0,  0, 0,  0, 0,  0, 0,  0, 0,  0, 0,  0, 0,  0, 0,  0, 0,  0, 0,  0, 0,  0, 0,  0, 0,  0, 0],
        [ 0, 0,  0, 0,  0, 0,  0, 0,  0, 0,  0, 0,  0, 0,  0, 0,  0, 0,  0, 0, 12, 6, 12, 6,  0, 0,  0, 0,  0, 0,  0, 0,  0, 0,  0, 0,  0, 0,  0, 0,  0, 0,  0, 0,  0, 0,  0, 0,  0, 0,  0, 0,  0, 0,  0, 0,  0, 0,  0, 0]
    ];
    
    var world = [];
    
    var sprite = new Image();
    sprite.onload = function(){
      drawIt(ctx, world);
    };
    
    for (var y = 0, lenY = mapBluePrint.length; y &lt; lenY; y++){
      world[y] = [];
      for (var x = 0, lenX = mapBluePrint[0].length; x &lt; lenX; x += 2)
        world[y].push(new Tile(x * 0.5 * 16, y * 16, 16, 16, sprite, mapBluePrint[y][x] * 16, mapBluePrint[y][x + 1] * 16));
      }
      sprite.src = "src/mario-8-bit-sprites.png";
    }
    
    (function(){main();})();
&lt;/script&gt;
</code></pre></div></div>

<h2 id="live-demo">Live Demo</h2>

<p>PS: The following tiles are rendered inside an HTML5 canvas 2D.</p>

<style>
#canvas_gwt_demo {
  width: 480px;
  height: 240px;
  border: 1px solid #aaa;
  margin: 50px auto 0;
  display: block;
  box-shadow: 0 0 50px #aaa;
}
</style>

<canvas id="canvas_gwt_demo" width="480" height="240"></canvas>
<script>
var Tile = function(_0x7125x2, _0x7125x3, _0x7125x4, _0x7125x5, _0x7125x6, _0x7125x7, _0x7125x8) {
    this['w'] = _0x7125x4;
    this['h'] = _0x7125x5;
    this['x'] = _0x7125x2;
    this['y'] = _0x7125x3;
    this['src'] = _0x7125x6;
    this['uv'] = [_0x7125x7, _0x7125x8];
};

function drawIt(_0x7125xa, _0x7125xb) {
    for (var _0x7125x3 = 0, _0x7125xc = _0x7125xb['length']; _0x7125x3 < _0x7125xc; _0x7125x3++) {
        for (var _0x7125x2 = 0, _0x7125xd = _0x7125xb[0]['length']; _0x7125x2 < _0x7125xd; _0x7125x2++) {
            _0x7125xa['drawImage'](_0x7125xb[_0x7125x3][_0x7125x2]['src'], _0x7125xb[_0x7125x3][_0x7125x2]['uv'][0], _0x7125xb[_0x7125x3][_0x7125x2]['uv'][1], _0x7125xb[_0x7125x3][_0x7125x2]['w'], _0x7125xb[_0x7125x3][_0x7125x2]['h'], _0x7125xb[_0x7125x3][_0x7125x2]['x'], _0x7125xb[_0x7125x3][_0x7125x2]['y'], _0x7125xb[_0x7125x3][_0x7125x2]['w'], _0x7125xb[_0x7125x3][_0x7125x2]['h']);
        };
    };
};

function main() {
    var _0x7125xf = document['querySelector']('#canvas_gwt_demo');
    _0x7125xf['width'] = 480;
    _0x7125xf['height'] = 240;
    var _0x7125xa = _0x7125xf['getContext']('2d');
    var _0x7125x10 = [
        [12, 6, 12, 6, 12, 6, 12, 6, 12, 6, 12, 6, 12, 6, 12, 6, 12, 6, 12, 6, 12, 6, 12, 6, 12, 6, 12, 6, 12, 6, 12, 6, 12, 6, 12, 6, 12, 6, 12, 6, 12, 6, 12, 6, 12, 6, 12, 6, 12, 6, 12, 6, 12, 6, 12, 6, 12, 6, 12, 6],
        [12, 6, 12, 6, 12, 6, 12, 6, 12, 6, 12, 6, 12, 6, 12, 6, 12, 6, 12, 6, 12, 6, 12, 6, 12, 6, 12, 6, 12, 6, 12, 6, 12, 6, 12, 6, 12, 6, 12, 6, 12, 6, 12, 6, 12, 6, 12, 6, 12, 6, 12, 6, 12, 6, 12, 6, 12, 6, 12, 6],
        [12, 6, 12, 6, 12, 6, 12, 6, 12, 6, 12, 6, 12, 6, 12, 6, 12, 6, 12, 6, 12, 6, 12, 6, 12, 6, 12, 6, 12, 6, 12, 6, 12, 6, 12, 6, 12, 6, 12, 6, 12, 6, 12, 6, 12, 6, 12, 6, 12, 6, 12, 6, 12, 6, 12, 6, 12, 6, 12, 6],
        [12, 6, 12, 6, 12, 6, 12, 6, 12, 6, 12, 6, 12, 6, 12, 6, 12, 6, 12, 6, 12, 6, 12, 6, 12, 6, 12, 6, 12, 6, 12, 6, 12, 6, 12, 6, 12, 6, 12, 6, 12, 6, 12, 6, 12, 6, 12, 6, 12, 6, 12, 6, 12, 6, 12, 6, 12, 6, 12, 6],
        [12, 6, 12, 6, 12, 6, 12, 6, 12, 6, 12, 6, 12, 6, 12, 6, 12, 6, 12, 6, 12, 6, 12, 6, 12, 6, 12, 6, 12, 6, 12, 6, 12, 6, 12, 6, 12, 6, 12, 6, 12, 6, 12, 6, 12, 6, 12, 6, 12, 6, 12, 6, 12, 6, 12, 6, 12, 6, 12, 6],
        [12, 6, 12, 6, 12, 6, 12, 6, 0, 7, 1, 7, 2, 7, 12, 6, 12, 6, 12, 6, 12, 6, 12, 6, 12, 6, 12, 6, 12, 6, 12, 6, 12, 6, 12, 6, 12, 6, 12, 6, 12, 6, 12, 6, 12, 6, 12, 6, 12, 6, 12, 6, 12, 6, 12, 6, 12, 6, 12, 6],
        [12, 6, 12, 6, 12, 6, 12, 6, 0, 8, 1, 8, 2, 8, 12, 6, 12, 6, 12, 6, 12, 6, 12, 6, 12, 6, 12, 6, 12, 6, 12, 6, 12, 6, 12, 6, 12, 6, 12, 6, 12, 6, 12, 6, 12, 6, 12, 6, 12, 6, 12, 6, 12, 6, 12, 6, 12, 6, 12, 6],
        [12, 6, 12, 6, 12, 6, 12, 6, 12, 6, 12, 6, 12, 6, 12, 6, 12, 6, 12, 6, 12, 6, 12, 6, 12, 6, 12, 6, 12, 6, 12, 6, 12, 6, 12, 6, 0, 0, 12, 6, 12, 6, 12, 6, 12, 6, 12, 6, 12, 6, 12, 6, 12, 6, 12, 6, 12, 6, 12, 6],
        [12, 6, 12, 6, 12, 6, 12, 6, 12, 6, 12, 6, 12, 6, 12, 6, 12, 6, 12, 6, 12, 6, 12, 6, 12, 6, 12, 6, 12, 6, 12, 6, 12, 6, 0, 0, 0, 0, 12, 6, 12, 6, 12, 6, 12, 6, 12, 6, 12, 6, 12, 6, 12, 6, 12, 6, 12, 6, 12, 6],
        [12, 6, 12, 6, 12, 6, 12, 6, 12, 6, 12, 6, 12, 6, 12, 6, 12, 6, 12, 6, 12, 6, 12, 6, 12, 6, 12, 6, 12, 6, 12, 6, 0, 0, 0, 0, 0, 0, 12, 6, 12, 6, 12, 6, 12, 6, 12, 6, 12, 6, 12, 6, 12, 6, 12, 6, 12, 6, 12, 6],
        [12, 6, 12, 6, 12, 6, 12, 6, 12, 6, 12, 6, 12, 6, 12, 6, 12, 6, 12, 6, 12, 6, 12, 6, 12, 6, 12, 6, 12, 6, 0, 0, 0, 0, 0, 0, 0, 0, 12, 6, 12, 6, 12, 6, 12, 6, 12, 6, 12, 6, 12, 6, 12, 6, 12, 6, 12, 6, 12, 6],
        [12, 6, 12, 6, 12, 6, 12, 6, 12, 6, 12, 6, 12, 6, 12, 6, 12, 6, 12, 6, 12, 6, 12, 6, 12, 6, 12, 6, 0, 0, 0, 0, 0, 0, 0, 0, 0, 0, 12, 6, 12, 6, 12, 6, 12, 6, 12, 6, 12, 6, 12, 6, 12, 6, 12, 6, 12, 6, 12, 6],
        [0, 0, 0, 0, 0, 0, 0, 0, 0, 0, 0, 0, 0, 0, 0, 0, 0, 0, 0, 0, 12, 6, 12, 6, 0, 0, 0, 0, 0, 0, 0, 0, 0, 0, 0, 0, 0, 0, 0, 0, 0, 0, 0, 0, 0, 0, 0, 0, 0, 0, 0, 0, 0, 0, 0, 0, 0, 0, 0, 0],
        [0, 0, 0, 0, 0, 0, 0, 0, 0, 0, 0, 0, 0, 0, 0, 0, 0, 0, 0, 0, 12, 6, 12, 6, 0, 0, 0, 0, 0, 0, 0, 0, 0, 0, 0, 0, 0, 0, 0, 0, 0, 0, 0, 0, 0, 0, 0, 0, 0, 0, 0, 0, 0, 0, 0, 0, 0, 0, 0, 0],
        [0, 0, 0, 0, 0, 0, 0, 0, 0, 0, 0, 0, 0, 0, 0, 0, 0, 0, 0, 0, 12, 6, 12, 6, 0, 0, 0, 0, 0, 0, 0, 0, 0, 0, 0, 0, 0, 0, 0, 0, 0, 0, 0, 0, 0, 0, 0, 0, 0, 0, 0, 0, 0, 0, 0, 0, 0, 0, 0, 0]
    ];
    var _0x7125xb = [];
    var _0x7125x11 = new Image();
    _0x7125x11['onload'] = function() {
        drawIt(_0x7125xa, _0x7125xb);
    };
    for (var _0x7125x3 = 0, _0x7125xc = _0x7125x10['length']; _0x7125x3 < _0x7125xc; _0x7125x3++) {
        _0x7125xb[_0x7125x3] = [];
        for (var _0x7125x2 = 0, _0x7125xd = _0x7125x10[0]['length']; _0x7125x2 < _0x7125xd; _0x7125x2 += 2) {
            _0x7125xb[_0x7125x3]['push'](new Tile(_0x7125x2 * 0.5 * 16, _0x7125x3 * 16, 16, 16, _0x7125x11, _0x7125x10[_0x7125x3][_0x7125x2] * 16, _0x7125x10[_0x7125x3][_0x7125x2 + 1] * 16));
        };
    };
    _0x7125x11['src'] = '/images/mario-8-bit-sprites.png';
}(function() {
    main();
})();
</script>]]></content><author><name>Rodrigo Silveira</name></author><summary type="html"><![CDATA[This is proof that I was one of the cool developers who grew up, graduated from jQuery, and stepped up their game using Google Web Toolkit (back when it was a Google project and the world was still purple and gray).]]></summary></entry><entry><title type="html">HTML5 Canvas 2D Custom Shader</title><link href="http://rodrigo-silveira.com/2013/11/05/html5-canvas-2d-api-suggestion-custom-shader/" rel="alternate" type="text/html" title="HTML5 Canvas 2D Custom Shader" /><published>2013-11-05T00:00:00+00:00</published><updated>2013-11-05T00:00:00+00:00</updated><id>http://rodrigo-silveira.com/2013/11/05/html5-canvas-2d-api-suggestion-custom-shader</id><content type="html" xml:base="http://rodrigo-silveira.com/2013/11/05/html5-canvas-2d-api-suggestion-custom-shader/"><![CDATA[<p>An interactive demo showing what the Canvas 2D API could be like if WebGL specific features could be exposed to the user (so the user could use WebGL without Canvas 3D). Yes, I once thought this would be a good idea :)</p>

<h1 id="about-this-post">About this post</h1>

<p>As mentioned in other posts… last night (November 4, 2020) I was showing my 7 year old daughter what Twitter is. I decided to show her some of the weird stuff I’d posted over the years. One of the posts was a link to an old demo I had posted on an old version of this blog. I clicked on the link, only to realize I’d removed all my old blog posts not related to my current pursuit of AI and Machine Learning. My daughter told me that I “should never delete stuff, because then people would never know what I had to say or show them.”</p>

<p>That 7 year old wisdom was enough motivation for me to dig through my Github account and find the code for that and other demos, which is what you’ll find below.</p>

<h1 id="the-original-content">The original content</h1>

<p>Once upon a time, I was misguided enough that I wanted to write a game in JavaScript from scratch. Why bother learning a full-featured, stable game engine/framework, if I could just build everything myself?! As part of this journey (which “only” lasted about 6 months), I thought it’d be nice the HTML5 Canvas 2D API exposed a way to allow a client to control the rendering of the canvas via the very specific implementation of WebGL Shaders. This was all because I didn’t want to use WebGL because Canvas 2D was so much simpler.</p>

<p>In order to submit an official request to the Google Chrome developers to add this feature in Chrome, I created the following demo. The engineer from the Chrome team that looked at my request was super kind. He gave me his feedback on what I was trying to achieve. He presented some ideas that made my proposal more viable, and even showed me how to file that request with the committee that actually handles official HTML5 APIs.</p>

<p>Long story short, I moved on from my game development hobby, and all that there is left of that adventure is this demo.</p>

<h2 id="the-demo">The Demo</h2>

<p>To be honest, I don’t remember all of the details about what I was actually proposing to the Google Chrome devs. Something about making it easier to do very low level custom rendering using the very general purpose Canvas 2D API. All I remember is that I was very excited about the visual effect of what I achieved by simulating what an extension to the Canvas API could look like.</p>

<style>
#demo {
    width: 100%;
    padding-top: 75%;
    position: relative;
}

#demo canvas {
    display: block;
    top: 0;
    left: 0;
    position: absolute;
    width: 100%;
    height: 100%;
    image-rendering: -moz-crisp-edges;
    image-rendering: -webkit-crisp-edges;
    image-rendering: pixelated;
    image-rendering: crisp-edges;
}

#ctrls {
    margin: 20px 0;
    width: 100%;
}

#ctrls button {
    margin: 0 20px 0 0;
    padding: 20px;
}
</style>

<div id="demo"></div>
<div id="ctrls"></div>
<script src="/js/demo/rain.js"></script>

<p>Copyright &copy; 2013 <a href="http://www.rodrigo-silveira.com" itemprop="url">
    <span itemprop="name">Rodrigo Silveira</span></a>. All rights reserved. Mega Man
    is an awesome game, and all its rights, trademarks, etc. are property of Capcom.</p>]]></content><author><name>Rodrigo Silveira</name></author><summary type="html"><![CDATA[An interactive demo showing what the Canvas 2D API could be like if WebGL specific features could be exposed to the user (so the user could use WebGL without Canvas 3D). Yes, I once thought this would be a good idea :)]]></summary></entry></feed>