This is proof that I was one of the cool developers who grew up, graduated from jQuery, and stepped up their game using Google Web Toolkit (back when it was a Google project and the world was still purple and gray).
About this post
As mentioned in other posts… last night (November 4, 2020) I was showing my 7 year old daughter what Twitter is. I decided to show her some of the weird stuff I’d posted over the years. One of the posts was a link to an old demo I had posted on an old version of this blog. I clicked on the link, only to realize I’d removed all my old blog posts not related to my current pursuit of AI and Machine Learning. My daughter told me that I “should never delete stuff, because then people would never know what I had to say or show them.”
That 7 year old wisdom was enough motivation for me to dig through my Github account and find the code for that and other demos, which is what you’ll find below.
The original content
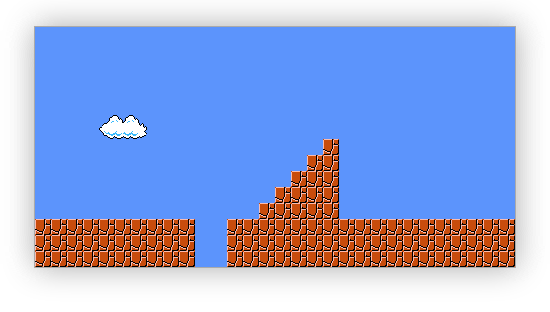
Lately I’ve been playing around with GWT (Google Web Toolkit) and HTML5 game development. My first goal at this point is to get a 2D tile-based game working, and my first sub-goal for that is to be able to load a map on a 2D canvas context. So far, this is what I have:
HTML5 2D Game Programming Tutorial with GWT

The setup behind this is pretty simple: I first define a Tile object that keeps track of its own with, height, as well as its x and y coordinates within the world (or within the map). Each tile also has a background image. In order to avoid having a million different images laying around, I put all of the skins to be used for each tile in a single sprite sheet.
![]()
I found this sprite sheet by doing a Google image search for “nes super mario brothers sprite sheet”.
Then, once I had my Tile class set up, the next step was to make a map to represent the world. In other words, I declared an array of arrays (a 2d array), where each element in the array represents an element of the grid within which my world is displayed.

Notice how the two tiles highlighted above can be described by their x and y offset from the beginning of the map, plus their width. For example, the first tile is located at position (0, 0). Suppose the tile’s width and height are 16 pixels. That means that the next tile to the right is located at (16, 0), or (x + width, y + height). By this definition, setting up a map blue print is pretty easy. For example,
var mapBluePrint = [
    [0, 0, 0, 0, 0, 0],
    [0, 8, 8, 8, 8, 0],
    [0, 0, 0, 0, 0, 0],
];
Represents a small 3x6 world. The way I’m setting up my map using the 2D array is as follows: Each row uses two elements to describe what tile they represent from the sprite sheet. For example, if I have a sprite sheet that holds 9 tiles (a 3x3 grid), and I want a particular tile (instance of Tile) to draw the 2 block across, and first block down on my sprite sheet (block at position (1, 0) within the sprite sheet), then the map will have an entry […, 1, 0, …] wherever I want that block rendered.
Once that map is in place, transferring it over to a 2d array of Tile objects is pretty trivial. Each visit to an element in my map results in the creation of a Tile object, with the appropriate parameter passed in straight from my parsing loop and the map blue print.
Once that is in place, rendering the world is just a matter of visiting each Tile and drawing it to the canvas context. Below is some throw-away prototype code I wrote in vanilla Javascript just to get a taste of how to implement the ideas mentioned above. Next step is to model my tile objects with a bit more thinking, then take it over to Java and let GWT do its thing.
Other things I’ll need to do before my game receives the breath of life include the following:
- Build a map maker utility to simplify things with creating maps
- Load maps from the server as needed (asynchronously)
- Write I/O engine (handle user input)
- Write a simple animation engine for character animation and scene animation
- Write collision detection and physics engine
- Add sound effects and music to the game
The Code
<style>
canvas {
  width: 480px;
  height: 240px;
  border: 1px solid #aaa;
  margin: 50px auto 0;
  display: block;
  box-shadow: 0 0 50px #aaa;
}
</style>
<canvas width="480" height="240">

<script>
    /*********************
     * The tile class
     *********************/
    var Tile = function(x, y, w, h, src, uvx, uvy){
      this.w = w;
      this.h = h;
      this.x = x;
      this.y = y;
      this.src = src;
      this.uv = [uvx, uvy];
    };

    /*********************
     * Loop through each time and draw it
     *********************/
    function drawIt(ctx, world){

    for (var y = 0, lenY = world.length; y < lenY; y++)
      for (var x = 0, lenX = world[0].length; x < lenX; x++)
        ctx.drawImage(world[y][x].src,
                      world[y][x].uv[0],
                      world[y][x].uv[1],
                      world[y][x].w,
                      world[y][x].h,
                      world[y][x].x,
                      world[y][x].y,
                      world[y][x].w,
                      world[y][x].h);
    }

    /*********************
     *
     *********************/
    function main(){

    var canvas = document.querySelector("canvas");
    canvas.width = 480;
    canvas.height = 240;

    var ctx = canvas.getContext("2d");

    var mapBluePrint = [
        [12, 6, 12, 6, 12, 6, 12, 6, 12, 6, 12, 6, 12, 6, 12, 6, 12, 6, 12, 6, 12, 6, 12, 6, 12, 6, 12, 6, 12, 6, 12, 6, 12, 6, 12, 6, 12, 6, 12, 6, 12, 6, 12, 6, 12, 6, 12, 6, 12, 6, 12, 6, 12, 6, 12, 6, 12, 6, 12, 6],
        [12, 6, 12, 6, 12, 6, 12, 6, 12, 6, 12, 6, 12, 6, 12, 6, 12, 6, 12, 6, 12, 6, 12, 6, 12, 6, 12, 6, 12, 6, 12, 6, 12, 6, 12, 6, 12, 6, 12, 6, 12, 6, 12, 6, 12, 6, 12, 6, 12, 6, 12, 6, 12, 6, 12, 6, 12, 6, 12, 6],
        [12, 6, 12, 6, 12, 6, 12, 6, 12, 6, 12, 6, 12, 6, 12, 6, 12, 6, 12, 6, 12, 6, 12, 6, 12, 6, 12, 6, 12, 6, 12, 6, 12, 6, 12, 6, 12, 6, 12, 6, 12, 6, 12, 6, 12, 6, 12, 6, 12, 6, 12, 6, 12, 6, 12, 6, 12, 6, 12, 6],
        [12, 6, 12, 6, 12, 6, 12, 6, 12, 6, 12, 6, 12, 6, 12, 6, 12, 6, 12, 6, 12, 6, 12, 6, 12, 6, 12, 6, 12, 6, 12, 6, 12, 6, 12, 6, 12, 6, 12, 6, 12, 6, 12, 6, 12, 6, 12, 6, 12, 6, 12, 6, 12, 6, 12, 6, 12, 6, 12, 6],
        [12, 6, 12, 6, 12, 6, 12, 6, 12, 6, 12, 6, 12, 6, 12, 6, 12, 6, 12, 6, 12, 6, 12, 6, 12, 6, 12, 6, 12, 6, 12, 6, 12, 6, 12, 6, 12, 6, 12, 6, 12, 6, 12, 6, 12, 6, 12, 6, 12, 6, 12, 6, 12, 6, 12, 6, 12, 6, 12, 6],
        [12, 6, 12, 6, 12, 6, 12, 6,  0, 7,  1, 7,  2, 7, 12, 6, 12, 6, 12, 6, 12, 6, 12, 6, 12, 6, 12, 6, 12, 6, 12, 6, 12, 6, 12, 6, 12, 6, 12, 6, 12, 6, 12, 6, 12, 6, 12, 6, 12, 6, 12, 6, 12, 6, 12, 6, 12, 6, 12, 6],
        [12, 6, 12, 6, 12, 6, 12, 6,  0, 8,  1, 8,  2, 8, 12, 6, 12, 6, 12, 6, 12, 6, 12, 6, 12, 6, 12, 6, 12, 6, 12, 6, 12, 6, 12, 6, 12, 6, 12, 6, 12, 6, 12, 6, 12, 6, 12, 6, 12, 6, 12, 6, 12, 6, 12, 6, 12, 6, 12, 6],
        [12, 6, 12, 6, 12, 6, 12, 6, 12, 6, 12, 6, 12, 6, 12, 6, 12, 6, 12, 6, 12, 6, 12, 6, 12, 6, 12, 6, 12, 6, 12, 6, 12, 6, 12, 6,  0, 0, 12, 6, 12, 6, 12, 6, 12, 6, 12, 6, 12, 6, 12, 6, 12, 6, 12, 6, 12, 6, 12, 6],
        [12, 6, 12, 6, 12, 6, 12, 6, 12, 6, 12, 6, 12, 6, 12, 6, 12, 6, 12, 6, 12, 6, 12, 6, 12, 6, 12, 6, 12, 6, 12, 6, 12, 6,  0, 0,  0, 0, 12, 6, 12, 6, 12, 6, 12, 6, 12, 6, 12, 6, 12, 6, 12, 6, 12, 6, 12, 6, 12, 6],
        [12, 6, 12, 6, 12, 6, 12, 6, 12, 6, 12, 6, 12, 6, 12, 6, 12, 6, 12, 6, 12, 6, 12, 6, 12, 6, 12, 6, 12, 6, 12, 6,  0, 0,  0, 0,  0, 0, 12, 6, 12, 6, 12, 6, 12, 6, 12, 6, 12, 6, 12, 6, 12, 6, 12, 6, 12, 6, 12, 6],
        [12, 6, 12, 6, 12, 6, 12, 6, 12, 6, 12, 6, 12, 6, 12, 6, 12, 6, 12, 6, 12, 6, 12, 6, 12, 6, 12, 6, 12, 6,  0, 0,  0, 0,  0, 0,  0, 0, 12, 6, 12, 6, 12, 6, 12, 6, 12, 6, 12, 6, 12, 6, 12, 6, 12, 6, 12, 6, 12, 6],
        [12, 6, 12, 6, 12, 6, 12, 6, 12, 6, 12, 6, 12, 6, 12, 6, 12, 6, 12, 6, 12, 6, 12, 6, 12, 6, 12, 6,  0, 0,  0, 0,  0, 0,  0, 0,  0, 0, 12, 6, 12, 6, 12, 6, 12, 6, 12, 6, 12, 6, 12, 6, 12, 6, 12, 6, 12, 6, 12, 6],
        [ 0, 0,  0, 0,  0, 0,  0, 0,  0, 0,  0, 0,  0, 0,  0, 0,  0, 0,  0, 0, 12, 6, 12, 6,  0, 0,  0, 0,  0, 0,  0, 0,  0, 0,  0, 0,  0, 0,  0, 0,  0, 0,  0, 0,  0, 0,  0, 0,  0, 0,  0, 0,  0, 0,  0, 0,  0, 0,  0, 0],
        [ 0, 0,  0, 0,  0, 0,  0, 0,  0, 0,  0, 0,  0, 0,  0, 0,  0, 0,  0, 0, 12, 6, 12, 6,  0, 0,  0, 0,  0, 0,  0, 0,  0, 0,  0, 0,  0, 0,  0, 0,  0, 0,  0, 0,  0, 0,  0, 0,  0, 0,  0, 0,  0, 0,  0, 0,  0, 0,  0, 0],
        [ 0, 0,  0, 0,  0, 0,  0, 0,  0, 0,  0, 0,  0, 0,  0, 0,  0, 0,  0, 0, 12, 6, 12, 6,  0, 0,  0, 0,  0, 0,  0, 0,  0, 0,  0, 0,  0, 0,  0, 0,  0, 0,  0, 0,  0, 0,  0, 0,  0, 0,  0, 0,  0, 0,  0, 0,  0, 0,  0, 0]
    ];

    var world = [];

    var sprite = new Image();
    sprite.onload = function(){
      drawIt(ctx, world);
    };

    for (var y = 0, lenY = mapBluePrint.length; y < lenY; y++){
      world[y] = [];
      for (var x = 0, lenX = mapBluePrint[0].length; x < lenX; x += 2)
        world[y].push(new Tile(x * 0.5 * 16, y * 16, 16, 16, sprite, mapBluePrint[y][x] * 16, mapBluePrint[y][x + 1] * 16));
      }
      sprite.src = "src/mario-8-bit-sprites.png";
    }

    (function(){main();})();
</script>
Live Demo
PS: The following tiles are rendered inside an HTML5 canvas 2D.